|
| Figure 1: Black plays and wins |
Playing Othello is like every game that is not based entirely on luck, if you want to win, you need a strategy. The most obvious strategy is not always the best though. When people first learn to play Othello, they are usually tempted to get as many stones they can, whenever they can. This strategy is known as the maximum disk strategy.
|
|
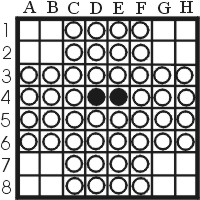
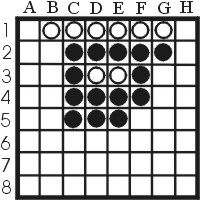
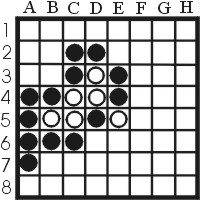
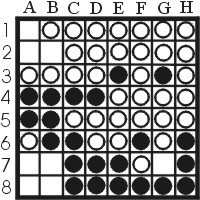
| Figure 1: Black plays and wins |
Having many stones in the beginning is not at all a guarantee that you will win in the end however! Consider for example the position in figure 1. White has 46 stones and black only 2, with 16 remaining moves. White however is very limited in its moves, which allows black to force white into making less then perfect moves. If black plays all moves right, and white plays the best possible moves too, then white will end up with all the corners, but black will have 46 stones. You may want to try to find the best play yourself, a solution in which black wins is not that hard, but 46 stones is a little puzzle. The solution is b2,a1,b1,-,a2,-,b7,a8,a7,-,g2,h1,g1,-,g8,h8,b8,g7,h2,-,h7.
There are several reasons why the maximum disk strategy usually fails. The two most important reasons are stable disks and mobility. The next sections will deal with these notions.
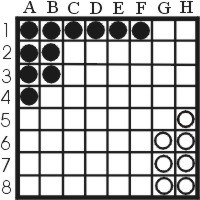
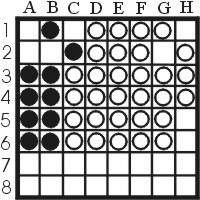
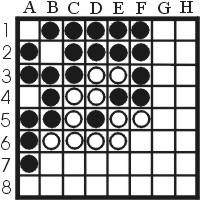
Let's start with stable disks. Stable disks are disks that can not be flipped by the opponent. Good examples of stable disks are corner stones. There is no way that an opponent can flip one of your cornerstones, so acquiring a corner stone in the beginning of the game, or in the middle part even, usually means that you will be able to use that corner to gain a lot of stable disks and thus win the game. Examples of stable stones are given in figure 2.
|
| Figure 2: Stabele disks |
Looking back at the example in figure 1, we see that white has 46 stones, but not one of these disks is stable. Thus black is able to turn a lot of the disks into black disks.
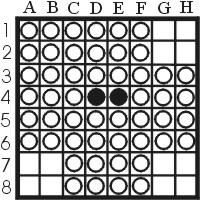
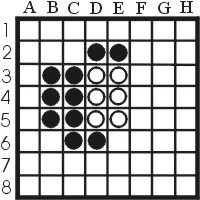
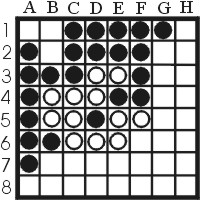
To see an example of the opposite situation: suppose that white also was able to completely capture one of the corners, leading to the situation 3.
|
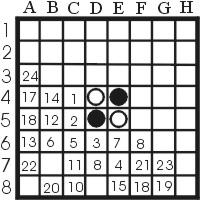
| Figure 3: Black starts, white wins |
Now the white stones in the north-west corner are completely safe, white has 21 stable stones in this situation. Black can still gain more stones then one would expect, but the dramatic change to 46 stones is gone. In fact, assuming perfect play, the end result will be 35 stones for white, and 29 for black. Once more, it is a nice puzzle to find the best way to play. The solution: b7,a8,a7,-,b8,-,g7,h8,g8,-,h7,-,g2,h1,h2,-,g1}.
Besides the lack of stable disks, white has another problem in our maximum disk problem. Looking at the maximum disk figure once more, we see that white can't make a move. It is this fact that allows black to force white into making bad moves. This brings us to the notion of mobility. One could say that mobility is the amount of moves that a player can make. Thus, someone with a low mobility only has a few options to choose from, while someone with high mobility can place a stone in a lot of different places. Before refining the definition, let's look at another example of why mobility is important.
|
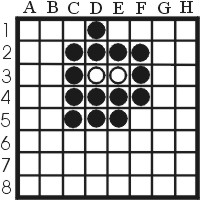
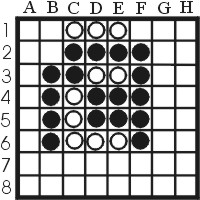
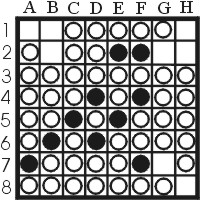
| Figure 4: Mobility |
In figure 4 we see a position in which black has enclosed white. Again, this is an extreme example of mobility difference, since black can make no valid moves and white a lot. This situation can be used by white to force black into making one or more bad moves. As an exercise, loot at the position now and try to find sequence of moves that will give white a corner. I hope you have done your ``homework'' by now, so lets look at the position together.
Analysis: White in total has 13 squares to place his stones. We want to force black however so we cant place our stone somewhere where it gives black multiple options. Basically this only leaves us the north side, since all the other options offer black at least two moves. So now we only have to consider the five possible moves on the north side. We can scratch one move immediately, namely g1.
Suppose we did play g1, then black would play f1 and would thus have gained a corner in the next round instead of white.
Another move that does not lead to our objective is e1. Black then plays f1, and then white either moves to b1, which opens the move c2 to black, or to one of the squares towards the east, west or south side and we already know that this gives black more options. Thus e1 does not lead to a good way of forcing black.
Starting with either b1 or f1 basically leads to the same end pattern, but a different corner. Lets look at b1 first. This leads to the sequence b1,c1,e1,f1,g1,g2. The situation has changed to figure 5.
|
| Figure 5 |
Technically we do not have a corner yet, but black was forced to place a stone at the X square g2, and this enables white to take the h1 corner for sure in this case. g4 for example provides a place on the diagonal. Of course, sometimes white wants to wait before actually taking the corner, to make things even more profitable, but this was a good example of using black's limited capability to move to get a corner.
If we place f1 first, then the sequence becomes f1,e1,c1,b1,b2 and again black is forced to take an X square.
The last possibility, and the most effective one, starts at c1. Black has to take b1, and white can answer with f1. Black's only option is to take e1, and white now directly can take a1.
We have seen how white can gain a corner from this situation. This does not mean that c1 is the best move overall though. Try this position out against a computer to try out several options and you will find that f5 is the best choice. After all, we're out to have the most stones in the end, and corners are a possible way to obtain that goal, but capturing corners is not always the best way. Playing f5 and subsequent moves will cause black to worsen its position even further before white will actually grab a corner.
Mobility is al about gaining many possible moves while reducing the possible moves of the opponent. Our previous examples gave extreme positions in which one color was completely surrounded by corners of the opponent. In general, both colors will have stones adjacent to one or more empty squares. These stones are called frontier stones. If several frontier discs adjacent to each other are of the same color, then we call it a frontier.

|
| Figure 6: Frontiers in the beginning of the game |
Figure 6 shows one large black frontier, and two smaller white frontiers. A large frontier can be very limiting for a player, since he can not make moves along his entire frontier. If white would play h3,h4 or h5 in figure 6, then that move would basically limit white to moves on the south and east side of the board. Similarly, black can only make moves in the north and east side of the board.
The basic idea of mobility was to gain as many possible moves while limiting the opponent's moves. Since frontiers block your moves, a general rule for placing stones is that you try to place stones in such a way that you have as little frontier disks as possible. We'll look at two examples to see how the notion of frontiers works in regular games.
|
| Figuur 7: Frontier moves: h6 is devastating for black |
Example 1:The first example is the situation given by figure 7. In this case, white has quite a large frontier (from c6 to h4) while black hardly has a frontier. Black would like to make a move which keeps its own frontier small and, if possible, white's frontier even larger. One move that would not accomplish this is h6. In this case, black almost completely takes over the frontier by flipping 5 of the white frontier stones. In contrast, the move c7 also flips 5 white stones, but only adds on frontier stone. Even more important, this frontier stone c7 does not offer white any good possibilities, since it only opens the option to either an X or a C square.
|
| Figure 8 |
Example 2: Figure 8 shows a game in an earlier stage of the game. Lets assume that black is the one to move. He already has a larger frontier then white has, so it is important that the frontier does not grow any further. The move e6 is a disastrous as h6 was in the previous example, so the possible moves are f2 until f6. The moves f3,f4 and f5 also lead to a large black frontier, so the only real options are to play either f2 or f6. There are moves that do not add to the frontier. These moves are quiet moves. They usually are the best options to play when possible. One example is figure quietmove, where black can play d6. This move does not open any new options for white to play, whereas white has no official quiet move after that. White does have one unofficial quiet move, a3. It is unofficial since it opens two new moves for black, but both options are so bad that black has gained no real options.

|
| Figure 9: An example of a quiet move |
Mobility is about reducing the opponents amount of possible squares while not running out of your own options, and this leads to the notion of tempo. Basically, if you can make a move which does not create a new possibility for your opponent and your opponent can't, then you have lowered his mobility. This is called: gaining a tempo. Quiet moves are nice examples of this notion. Gaining tempo's is a good thing since your opponent is forced to increase his frontier, thus lowering mobility. A nice example is figure 10.
|
| Figure 10: White starts and increases mobility |
White can play b1,f1,g1 and black has to make 3 moves as well. The only option created by whites moves is b2 or g2, both X squares. Black does not want to play there, so he is forced to flip the three white stones c6,d6 and e6 in the three turn. After these three moves, white has no frontier except for c2 and f2, and black is in serious trouble.
Another situation which frequently appears during games is given in figure 11. The point of this board are the three empty squares a2,a3 and b3. This triangle appears quite often, and in this case white can use it to gain mobility. The sequence is a3,a2,b3. If white does not force this, then black can play b3. Thus black gains a move if white responds with a3, and nothing is won if white plays a2.
|
| Figure 11: A standard situation for gaining mobility |
Moves that allow tempo gaining are very strong, but that does not mean that you have to play them right away. Most of the time, saving these moves until you really need them tends to make them even stronger.
A wedge is a situation where a player places a stone between two stones of his opponent, in such a way that he ``wedges'' those two stones. For example, if white plays a4 in figure 12, then he places a wedge between the black stones on the first column.
|
| Figure 12: White plays a4, wedging the first column |
Wedges are powerful stones when it comes to capturing corners. In the example, white can take both corners. Another situation in which wedging often occurs is the one in figure 13. White can play b2 in this case, thus sacrificing the a1 corner. However, if black plays a1, then white can make a wedge by playing a2, and after that a8. In this case, black has gained a corner, and secured the first column, but white has gained a corner too and also the first row. This particular type of wedging is often used when sacrificing a corner. An edge that permits this kind of wedging is also known as an unbalanced edge.When playing Othello in the begin stage of the game, it is usually wise not to try and grab edges because they usually end becoming unbalanced edges and pose a threat in the middle and end stage.
|
| Figuur 13: Placing a wedge using a corner sacrifice |
In general, if a game is played without either of the players passing, white places the last stone on the board. This offers a slight advantage. If white has to pass once however, then parity changes to black's advantage. In the end game, usually certain holes on the board remain, consisting out of 1 to 4 empty squares. For example, look at figure 14.
|
| Figure 14: Black plays and wins |
Black has to play and there is only one way to win, assuming perfect play from white of course. Try to find the solution before reading on. The solution is a1,g2,b2,g7,h8,b1,h1,h2. The finishing blow of this solution lies in the fact that white has to pass after the h1 move. Although white has 46 stones with only two moves left, black still wins, mainly because of the parity change.
In general, if there is an odd number of empty spaces, parity can change, while even number of empty squares usually preserve parity.
One more example: the end position of a game between J. Lysons and E. Lazard at the Cambridge tournament in 1984 is given in figure 15. Black has to play and draw. Once more, try to find the solution before looking at the analysis.
|
| Figure 15: Black plays and draws |
Analysis: Black has to move first, 8 squares are empty, so at this moment white gets to make the last move. There is one empty place with an even amount of squares, and 2 odd. Of course, we're not only focusing on parity alone, all the other ideas we have seen so far are in place. White cant play inside the north-west corner, so we'll stay away from that place. Why? There are 5 other empty squares. Regardless of what player makes the 5th move, black can always start in the north-west corner and also gets the last move. This guarantees our parity advantage, which is what we want. So lets look at the remaining 5 empty squares. G7 is a very good winner, since black then immediately gains 8 stable stones. White has to move, basically has to choose between b7 and b8. White will play b8, otherwise black can win 33-31 by playing b2,b8,a8,a1,a7,a2. Black can now take the corner a8. White has to play a7, otherwise we can win 35-29. And we're done. B7 creates a few more stables disks. White has to pass, so we can make the final move. Counting stones shows that the next move is b2. White has no choice but to play a1 (otherwise black wins with 34-30), and a2 brings the score to 32-32.
Once more: this example, like the others, has been chosen to illustrate the definitions that we have discussed, and not every end game works according to these rules. It is up to you to determine what plan works best. There are games where you can gain parity, but it will cause you to lose the game. In these cases, forget parity. You're in it for the stones, not for your knowledge of funny concepts :)
Keeping the idea of mobility as standard strategy in mind, we can give the following rules of thumb for openings in Othello:
Mind that these rules are not carved in stone, but they apply very well for most of the games. In fact, they do not only apply to openings, but also to the middle section of the game.
The first and third rule immediately follow from mobility arguments. The fourth rule, combined with the second, is partially fixed on the idea that if your stones are scattered, then keeping a small frontier is hard. Why? If you place a stone, then you have other stones all over the board, causing lots of stones to flip. The fifth rule has already been mentioned. If you take edges too soon, then you usually end up with an end game in which you have several unbalanced edges, and you opponent is playing with a wide smile on his or her face.
Using these general rules, one nice description of how to play is ``to try to get enclosed''. This also is known as: ``curling into a ball''.
As with every rule, how flexible they may be, there are always exceptions. One strategy, that can be wonderful or disastrous (really, really disastrous), is the ``creeping along edges'' strategy. What is this strategy about? Instead of trying to have the opponent enclose you while you are a small cluster of stones in the middle of the board, you try to gain control of one or two edges. You try to gain a lot of tempi while doing so, to leave the opponent in a position where he has no free moves when you have the edges. After that you force the opponent to sacrifice a good corner and you are set. The one problem with this strategy is that if the opponent is able to have one move left after you have the edges, then you basically can just give up. So either you win by using a daring short term strategy, or you lose big time because your position offers no long term prospects.
A nice example of creeping is given in this game, in which I used the technique while playing white:
 |
| Figure 15: An example of creeping to the edges |
Once you have grasped all the ideas presented in this manual, and are quite familiar with them, you will find that Othello games generally move into certain stages. There is an opening stage of about roughly 20-26 moves, a middle stage and and end stage (starting somewhere between 16 to 10 moves before the end). The end game is a matter of good calculating using the concepts given and also practice (the freeware program Icare is \textbf{great} for practicing Othello games). The middle game is also about rules, directed more at how to attack edges and gaining tempi.
The opening of Othello roughly obeys the rules mentioned before, but this may not be enough against really experienced players. For example: there are positions in which all the rules can not help you determine what move to make. Your opponent may know what move is better simply because he has played both options several times and found out that one move simply works out better in the long run. Fortunately you can tap into the common Othello openings source of the last decade. Almost any Othello game played on tournaments is collected in the Thor database.
Furthermore, Robert Gatliff has made a huge list containing standard openings and the percentage in which each is played. This knowledge is collected in a Java programme, so that you can easily learn standard openings. The occurrence percentage allows you to learn the openings that are played most first, and after that to continue into the more obscure ones. A small tip: try to learn like 3 openings at first, and learn them well (like 20 moves deep, with several variances), before going on.
So, to sum it all up, there are three programs that can help you advance in Othello (besides playing humans of course). Luckily they are all free to download, so do not hesitate and get hooked.
Also, playing human adversaries is a world apart. There are several places where you can meet other people. Common places are: \begin{itemize} \item Vog (www.vog.ru) which has a very nice graphical layer for $\$24$ a year. \item The Zone (www.zone.com/reversi), microsoft's server, for free. The Zone has several rooms, for beginners and more advanced players. \item Yahoo \end{itemize}